Assigning Microsoft Flow (Power Automate) approvals to Office 365 Groups
On 4 minutes
If you are coming from SharePoint background and you are used to the SharePoint approval process, one of the features you will find missing (as at the time of this post) is the ability to assign Office 365 groups or SharePoint groups as an approver when using Flow approval.
The “Start an approval” action in Flow, only supports assigning an approval flow to one individual email address (one approver) or multiple email addresses separated by a semicolon (multiple approvers).
Being able to assign approval process to groups is very important especially when you are dealing with a fluid environment. You do not want to tie an approval process to an individual. This will cause a problem when the individual cannot work on the process for some reasons. In a situation where the person leaves the organization altogether, you might have to go back and change these approval flows. Using groups solves this. You just remove the person and add the new person to the group, and the flow works. You don’t have to touch the process.
In this post, I will show you a work around to solve this issue. This will be a flow that is triggered when an item is added to a SharePoint list. I will walk you through the process.
Step 1. Create a blank Flow
Step 2: For the trigger, select When an item is created
Step 3: Add the Initialize variable action. Name the variable EmailList. The type will be an array
Step 4: Add the List Group member action. For the Group Id, enter the Office 365 group you want send the approval to.
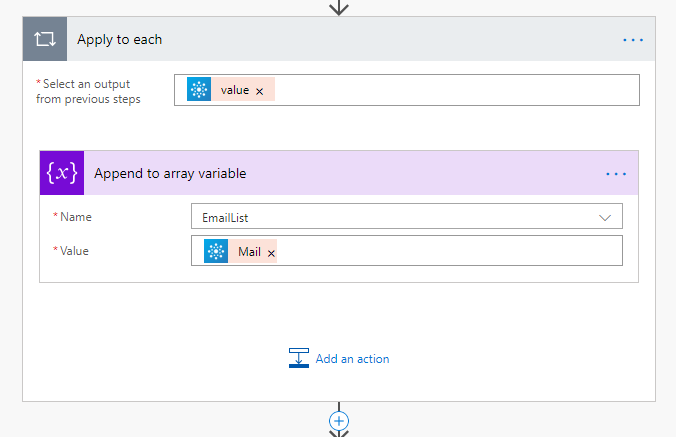
Step 5: Add the control, Apply to each. This action is used to loop through an array of items. For Select and output from previous step, use the dynamic dialog to select value
Add the Append to array action inside the Apply to each control. For the name, enter EmailList and for the value, use the dynamic dialog to select Mail
Step 6: Add a Join action. This action is used to join array elements with a specified glue. For the Join with, enter ;
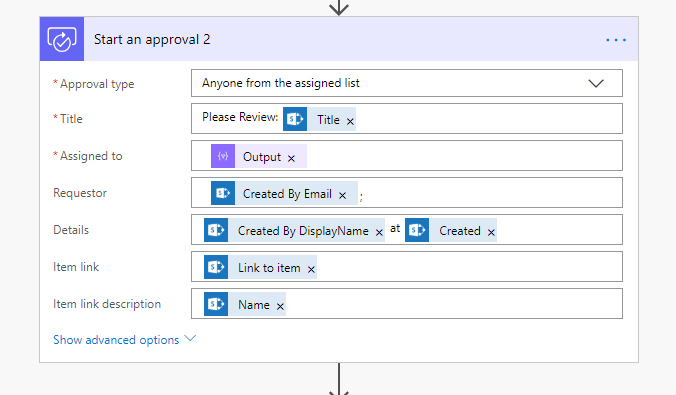
Step 7: Now add the approval process action. For the Assigned To, use the dynamic dialog box to select output, under the join action. The output variable contains the email list joined together with ;.
All that is left is to complete your approval process steps and test your flow.
Other posts you might be interested in
- Which User Context does Microsoft Power Automate Run?
- Using OData Query to Filter SharePoint List Items by Lookup Fields in Microsoft Flow (Power Automate)
- Calling REST API with Microsoft Flow (Power Automate)
- The Retirement of SharePoint 2013 Workflows: What You Need to Know
- Making Office 365 Work for you: Monitoring ATMs


Many thxxxxxxx