How to Access SharePoint using an Application Context
On 6 minutes
If you have done any development using the SharePoint client-side object model (CSOM), you understand the importance of instantiating the proper ClientContext object to access data in a particular SharePoint site.
In this post, I will talk about how to access SharePoint using an application context, also known as app-only. Of the bat, there are two ways of doing app-only for SharePoint, you can use an Azure AD application or a SharePoint App-Only principal.
Using an Azure AD application:
In this scenario, you define an application in Azure AD and then grant the application permissions to access SharePoint. Which means, this is the preferred method when using SharePoint Online because you can also grant permissions to other Office 365 services to the application. If you’re using SharePoint on-premises, you have to use the SharePoint Only model via Azure ACS
In Azure AD, when doing app-only, you typically use a certificate to request access: anyone having the certificate and its private key can use the app and the permissions granted to the app. More information can be found here and here.
Using a SharePoint App-Only principal:
With this method, we create an identity in SharePoint and access resources using this identity. This model works for both SharePoint Online and SharePoint 2013/2016 on-premises and is ideal to prepare your applications for migration from SharePoint on-premises to SharePoint Online.
Setting up an app-only principal
Navigate to a site in your tenant (e.g. https://contoso.sharepoint.com) and then call the _layouts/15/appregnew.aspx page (e.g. https://contoso.sharepoint.com/_layouts/15/appregnew.aspx) . On this page click on the Generate button to generate a client id and client secret and fill the remaining information like shown in the screen-shot below.
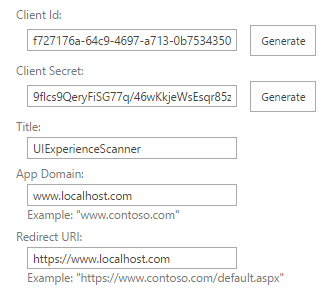
Store the retrieved information (client id and client secret) since you’ll need this in the next step!
Next step is granting permissions to the newly created principal. These permissions indicate the activities that an application is permitted to do within the requested scope.
Permissions can be granted by going to _layouts/15/appinv.aspx page. For tenant scope permission, granting can only be done via the appinv.aspx page on the tenant administration site. You can reach this site via https://contoso-admin.sharepoint.com/_layouts/15/appinv.aspx.
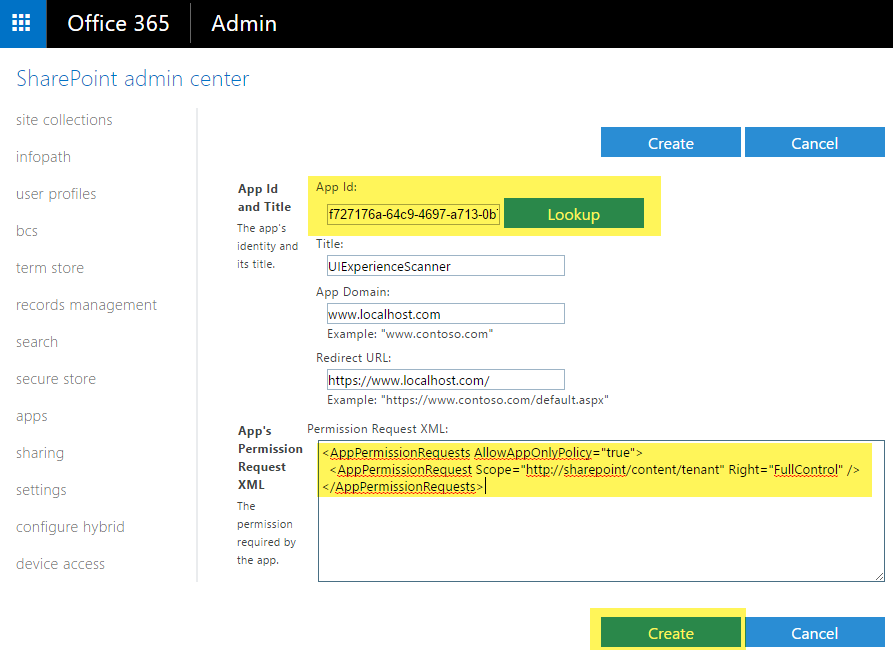
To grant permissions, you’ll need to provide the permission XML that describes the needed permissions. Example
<AppPermissionRequests AllowAppOnlyPolicy="true">
  <AppPermissionRequest Scope="http://sharepoint/content/tenant" Right="FullControl" />
</AppPermissionRequests>
SharePoint supports four rights levels in the content database. For each scope, an application can have the following rights:
- Read
- Write
- Manage
- FullControl
These rights correspond to the default user permission levels of SharePoint: Reader, Contributor, Designer, and Full Control.
SharePoint supports four different permission scopes within the content database and tenancy.
| Scope | Scope URI | Description |
| Tenancy | http://sharepoint/content/tenant | The tenancy where the add-in is installed. Includes all children of this scope. |
| Site Collection | http://sharepoint/content/sitecollection | The site collection where the add-in is installed. Includes all children of this scope. |
| Website | http://sharepoint/content/sitecollection/web | The website where the add-in is installed. Includes all children of this scope. |
| List | http://sharepoint/content/sitecollection/web/list |
A
single list in the website where the add-in is installed. When the user who installs the add-in is prompted to grant permissions, the dialog enables the user to select one list to which the add-in is granted permissions. |
Special Permissions
Search Service
Because the search service crawls all the data in the tenant, coupled with the fact that users should only see results that they have permissions to access, you cannot use AllowAppOnlyPolicy. Also, there is only one permission scope, QueryAsUserIgnoreAppPrincipal
<AppPermissionRequests AllowAppOnlyPolicy="false">
   <AppPermissionRequest Scope="http://sharepoint/search"
    Right="QueryAsUserIgnoreAppPrincipal" />
</AppPermissionRequests>
Taxonomy
Only read and write permission can be granted and it supports app only permissions.
<AppPermissionRequests AllowAppOnlyPolicy="true">
   <AppPermissionRequest Scope="http://sharepoint/taxonomy"
    Right="Read" />
</AppPermissionRequests>
Business Connectivity Service
Supports only read access.
<AppPermissionRequests AllowAppOnlyPolicy="true">
   <AppPermissionRequest Scope="http://sharepoint/bcs/connection"
    Right="Read" />
</AppPermissionRequests>
User Profiles
Supports Read, Write, Manage and FullControl rights.
<AppPermissionRequests AllowAppOnlyPolicy="true">
   <AppPermissionRequest Scope="http://sharepoint/social/tenant"
    Right="Read" />
</AppPermissionRequests>
Obtaining an Access Token using HTTP REST
Using the app id, client id and client secret, you can obtain an access token. You can obtain your tenant_id from your Azure AD. {{host}} is your SharePoint tenant URL. {{principal}} is always the constant 00000003-0000-0ff1-ce00-000000000000
var formdata = new FormData();
formdata.append("grant_type", "client_credentials");
formdata.append("client_id", "{{app_id}}@{{tenant_id}}");
formdata.append("client_secret", "{{client_secret}}");
formdata.append("resource", "{{principal}}/{{host}}@{{tenant_id}}");

var requestOptions = {
  method: 'POST',
  body: formdata,
  redirect: 'follow'
};

fetch("https://accounts.accesscontrol.windows.net/{{tenant_id}}/tokens/OAuth/2", requestOptions)
  .then(response => response.json())
  .then(result => console.log(result.access_token))
  .catch(error => console.log('error', error));
Below is an example of how to access SharePoint resources using token obtained.
var myHeaders = new Headers();
myHeaders.append("Authorization", "Bearer {{access_token}}");
myHeaders.append("Accept", "application/json;odata=nometadata");

var requestOptions = {
  method: 'GET',
  headers: myHeaders,
  redirect: 'follow'
};

fetch("https://{{host}}/teams/dev/_api/web/lists/getbytitle('Test')/items?$inlinecount=allpages&$select=Id", requestOptions)
  .then(response => response.json())
  .then(result => console.log(result))
  .catch(error => console.log('error', error));
If you are interested in using CSOM, you can read this blog post.
What are the limitations when using app-only
App-Only does not work in following cases:
- Updating taxonomy service entries (write) – read works
- Creating modern team sites does not support app-only when you use the SharePoint API for it. When modern team sites are created using Microsoft Graph to create the group then app-only is a supported scenario
- Creating communication sites is supported in app-only context, but owner property is required. using the SharePoint API
- Search when using SharePoint On-Premises. SharePoint Online support for it has been added (blog post)
- User Profile CSOM write operations do not work with Azure AD application – read operations work. Both read and write operations work through SharePoint App-Only principal
- User Profile Bulk Update API can be used with app-only permissions
- Manipulating files via WebDav protocol and CSOM (using
File.SaveBinaryDirect) does not work with app-only