All you need to know about Azure AD Application, Web App and Web API authorization
On 12 minutes
If you decide to host your Web Apps/Client applications and Web APIs (referred here after as apps) in Azure, then you should consider using Azure Ad to secure your application. The advantages here are that, your Azure AD administrator can centrally manage access to all applications registered with Azure AD. Users with active accounts can seamlessly work with your applications that leverage API secured with Azure AD.
When you secure your apps with Azure AD, you get the OAuth authentication out of the box. That means, you can access your API from wide range of application types.
To secure your Web API, you will need an application object.
App registration overview
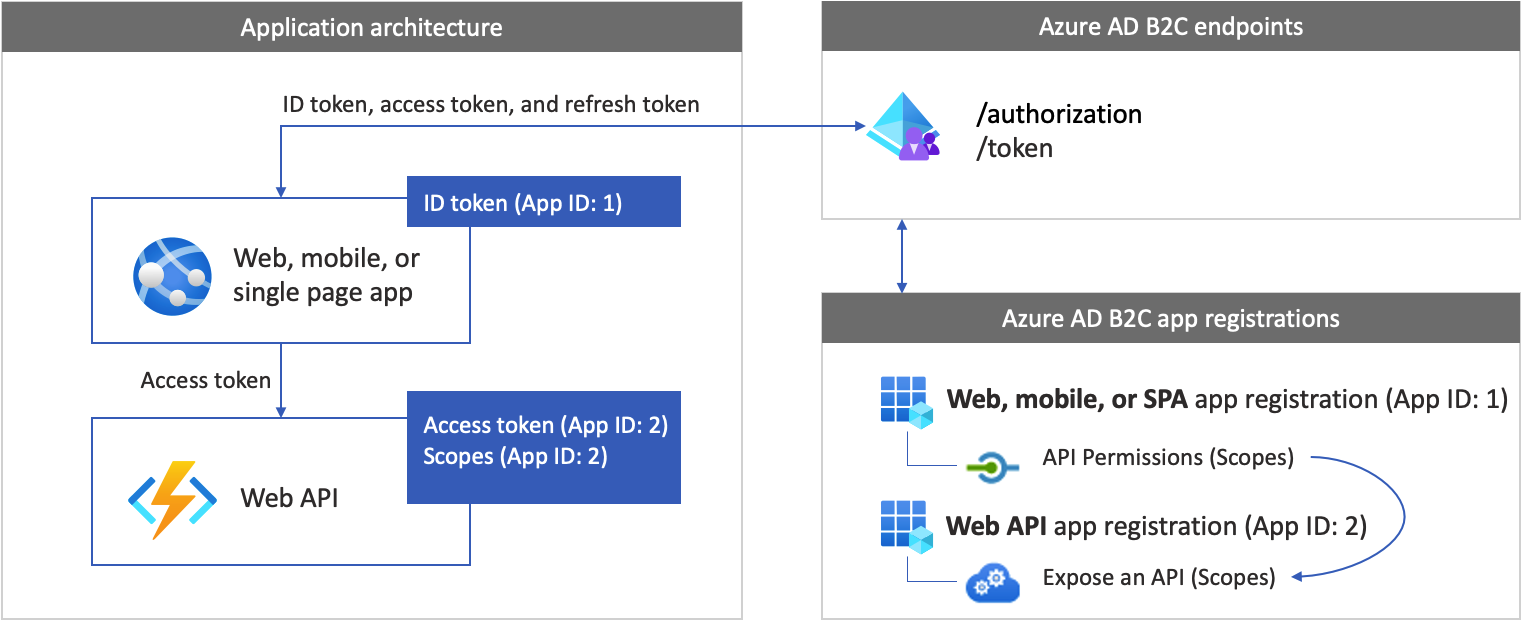
To enable your app to sign in with Azure AD and call a web API, you must register two applications in the Azure AD directory.
- The web, mobile, or SPA application registration enables your app to sign in with Azure AD B2C. The app registration process generates an Application ID, also known as the client ID, which uniquely identifies your application (for example, App ID: 1).
- The web API registration enables your app to call a protected web API. The registration exposes the web API permissions (scopes). The app registration process generates an Application ID, which uniquely identifies your web API (for example, App ID: 2). Grant your app (App ID: 1) permissions to the web API scopes (App ID: 2).
The application registrations and the application architecture are described in the following diagram:
Creating Application Object
Application objects can be created from the App Registrations blade of the Azure Active Directory service from the Azure portal. There are differences in the configuration of Web App and Web Api, and I shall point out the differences when necessary.
You start of by giving a name to the application and selecting the supported accounts that you want to authenticate with your apps.
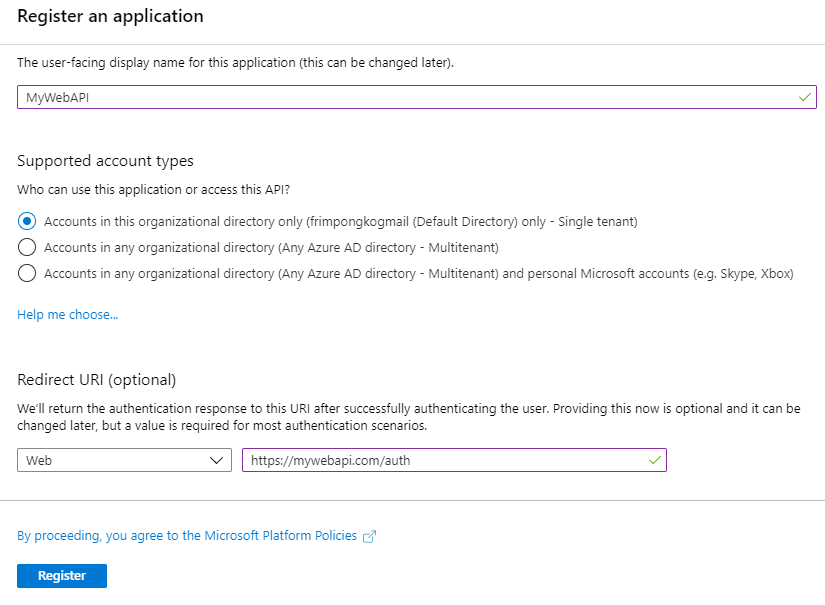
Redirect URI
Web APIs don’t need to register a redirect URI because no user is interactively signed in.
Application ID URL, Scopes and Permissions
Before you can access any resource in any directory, a user from that directory must give consent to it. Some permissions need to be consented to by an administrator of that directory.
To enable a user consent to the permissions, you need to inform Azure AD the permissions your app needs so it can prompt users for their consent. This is done from the API permissions blade.
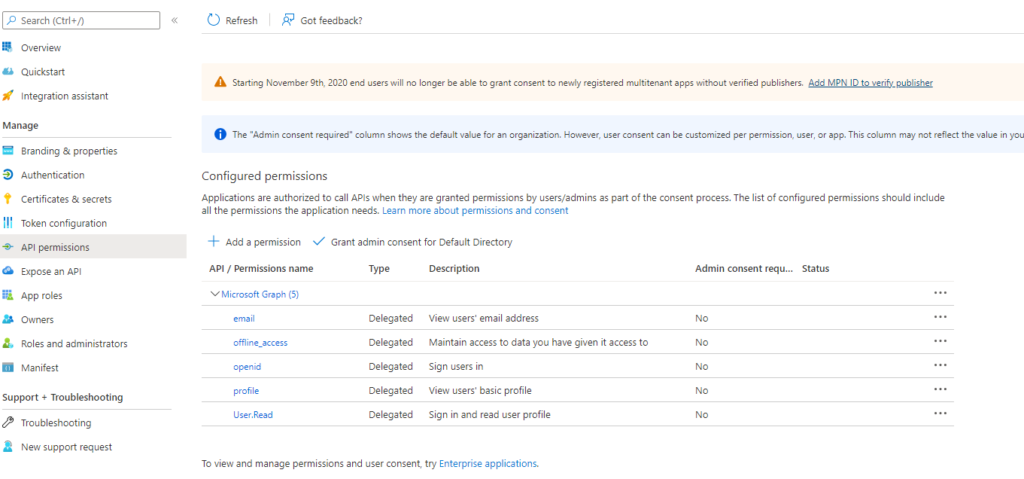
These permissions are referred to as delegated permissions. Delegated permissions are grouped into scope. A scope defines a list of delegated permissions. Scopes usually have the form resourceURI/scopeName. For Microsoft Graph, the scopes have shortcuts. For example, User.Read is a shortcut for https://graph.microsoft.com/user.read.
Each scope is indicated by appending the permission value to the resource’s identifier (the application ID URI). By default, the application registration portal recommends that you use the resource URI api://{clientId}. This URI (referred to as Application ID URI) is unique but not human readable.
Scopes are what appear on the consent window that’s presented to users of your app.
Your Web APIs secured with Azure AD (users access the web api using their Azure AD credentials) can also define permission scopes. All APIs have to publish a minimum of one scope for the clients to obtain an access token successfully. To do this, go to the Expose an API blade. Below are the steps you can take to create a scope for your Web APIs.
- Select Expose an API in the application registration.
- Select Add a scope.
- If prompted, accept the proposed application ID URI (
api://{clientId}) by selecting Save and Continue. - Specify these values:
- Select Scope name and enter access_as_user.
- Select Who can consent and make sure Admins and users is selected.
- Select Admin consent display name and enter Access TodoListService as a user.
- Select Admin consent description and enter Accesses the TodoListService web API as a user.
- Select User consent display name and enter Access TodoListService as a user.
- Select User consent description and enter Accesses the TodoListService web API as a user.
- Keep the State value set to Enabled.
- Select Add scope.
You then need to add this scope to the Web App permission list.
App Roles/Application Permissions
An App role or application permission is a software developer’s way to expose application permissions. An application permission is granted to an application by an organization’s administrator, and can be used only to access data owned by that organization and its employees.
When authenticating as an application (as opposed to with a user), you can’t use delegated permissions because there is no user for your app to act on behalf of. You must use application permissions, also known as app roles, that are granted by an admin or by the API’s owner. Your web API can check if a specific request access token contains a specific app role you have defined.
To expose application permissions for your Web API, you can use the Apps role UI or edit the manifest.
To create an app role by using the Azure portal’s user interface:
- Sign in to the Azure portal.
- Select the Directory + subscription filter in top menu, and then choose the Azure Active Directory tenant that contains the app registration to which you want to add an app role.
- Search for and select Azure Active Directory.
- Under Manage, select App registrations, and then select the application you want to define app roles in.
- Select App roles, and then select Create app role.
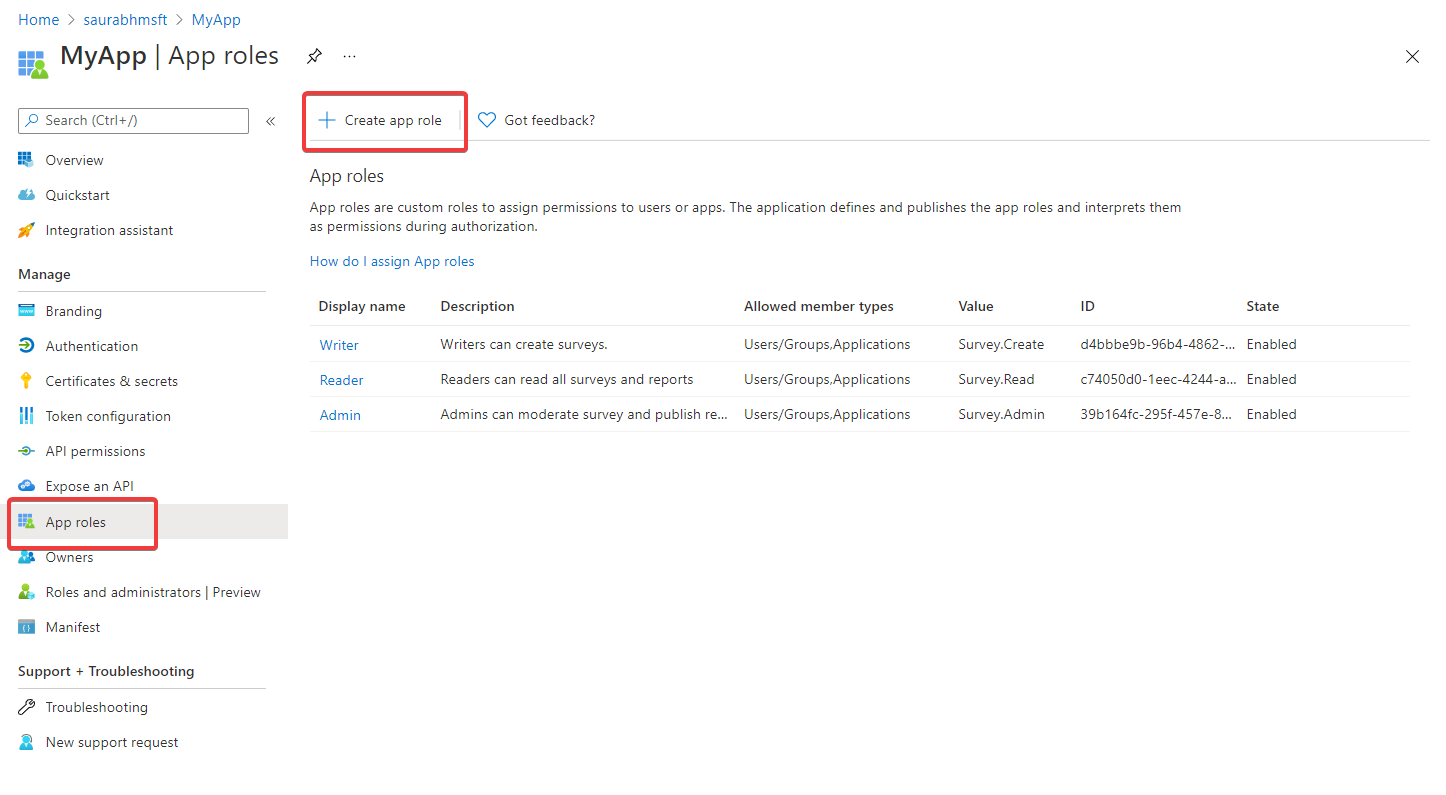
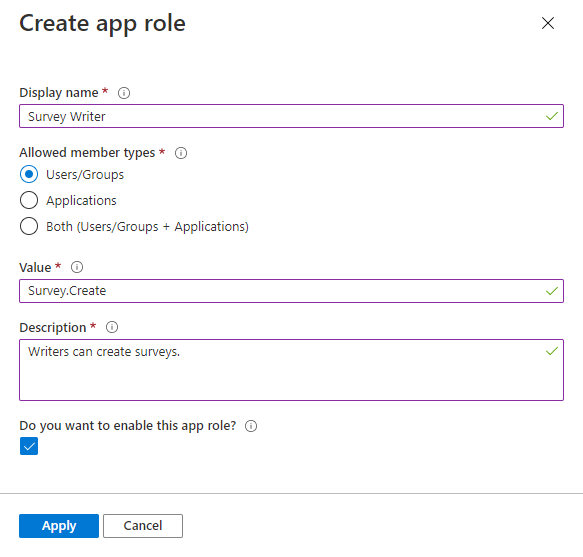
- In the Create app role pane, enter the settings for the role. The table following the image describes each setting and their parameters.
To edit the manifest
- In the application registration for your application, select Manifest.
- To edit the manifest, find the
appRolessetting and add application roles. The role definitions are provided in the following sample JSON block. - Leave
allowedMemberTypesset to"Application"only. - Make sure
idis a unique GUID. - Make sure
displayNameandvaluedon’t contain spaces. - Save the manifest.
The following sample shows the contents of appRoles, where the value of id can be any unique GUID.
"appRoles": [
  {
    "allowedMemberTypes": [ "Application" ],
    "description": "Writers can create survey.",
    "displayName": "Survey Writer",
    "id": "ccf784a6-fd0c-45f2-9c08-2f9d162a0628",
    "isEnabled": true,
    "lang": null,
    "origin": "Application",
    "value": "Survey.Create"
  }
],
Then, configure the required app roles your Web App will need by selecting those permissions in your Web App’s app registration. To assign app roles to an application by using the Azure portal:
- Sign in to the Azure portal.
- In Azure Active Directory, select App registrations in the left-hand navigation menu.
- Select All applications to view a list of all your applications. If your application doesn’t appear in the list, use the filters at the top of the All applications list to restrict the list, or scroll down the list to locate your application.
- Select the application to which you want to assign an app role.
- Select API permissions > Add a permission.
- Select the My APIs tab, and then select the app for which you defined app roles.
- Select Application permissions.
- Select the role(s) you want to assign.
- Select the Add permissions button complete addition of the role(s).
The newly added roles should appear in your app registration’s API permissions pane.
One of the benefits of app roles is that you can ensure Azure AD issues tokens for your web API to only clients that a tenant admin approves. for the app role. You can also configure Azure AD to issue API tokens only to apps that the tenant admin approves for API access. If you configure this option, Azure AD checks the app role assignments of a client when it requests a web API access token. If the client isn’t assigned to any app roles, Azure AD will return the error message “invalid_client: AADSTS501051: Application <application name> isn’t assigned to a role for the <web API>”.
To add this increased security:
- Go to the app Overview page for your app registration.
- Under Managed application in local directory, select the link with the name of your app. The label for this selection might be truncated. For example, you might see Managed application in …When you select this link, you go to the Enterprise Application Overview page. This page is associated with the service principal for your application in the tenant where you created it. You can go to the app registration page by using the back button of your browser.
- Select the Properties page in the Manage section of the Enterprise application pages.
- If you want Azure AD to allow access to your web API from only certain clients, set User assignment required? to Yes.
Your web API can always verify that the application has the right role, which is authorized by the tenant admin. The API performs this verification by validating that the access token has a role claim and that the value for this claim is correct. In the previous JSON sample, the value is Survey.Create.
App roles cannot be consented to by a user (as they’re used by an application that call the web API on behalf of itself). A tenant administrator will need to consent to client applications of your web API (exposing app roles).
On-Behalf-Of flow
The OAuth 2.0 On-Behalf-Of flow (OBO) serves the use case where an application invokes a service/web API, which in turn needs to call another service/web API. The idea is to propagate the delegated user identity and permissions through the request chain. For the middle-tier service to make authenticated requests to the downstream service, it needs to secure an access token from the Microsoft identity platform, on behalf of the user.
The steps that follow constitute the OBO flow and are explained with the help of the following diagram.
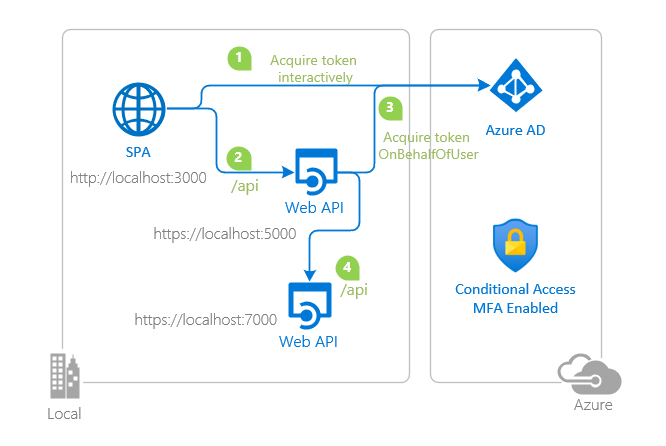
- A user is authenticated on an application (SPA) using the OAuth 2.0 authorization code grant flow or another login flow.
- SPA authenticates to the Microsoft identity platform token issuance endpoint to request for a Token A to access Web API A. SPA uses its
client_id,client_secretand scope defined by Web API A. Token A will have anaudclaim of API A. - The SPA makes a request to API A with Token A (with an
audclaim of API A). - API A authenticates to the Microsoft identity platform token issuance endpoint and requests a token to access API B.
- The Microsoft identity platform token issuance endpoint validates API A’s credentials along with Token A and issues the access token for API B (Token B) to API A.
- Token B is set by API A in the authorization header of the request to API B.
- Data from the secured resource is returned by API B to API A, then to the client.
Gaining consent for the middle-tier application
Depending on the architecture or usage of your application, you may consider different strategies for ensuring that the OBO flow is successful. In all cases, the ultimate goal is to ensure proper consent is given so that the client app can call the middle-tier app, and the middle tier app has permission to call the back-end resource.
The middle tier application adds the client to the known client applications list (knownClientApplications) in its manifest. If a consent prompt is triggered by the client, the consent flow will be both for itself and the middle tier application. On the Microsoft identity platform, this is done using the .default scope. When triggering a consent screen using known client applications and .default, the consent screen will show permissions for both the client to the middle tier API, and also request whatever permissions are required by the middle-tier API. The user provides consent for both applications, and then the OBO flow works.
The resource service (API) identified in the request should be the API for which the client application is requesting an access token as a result of the user’s sign-in. For example, scope=openid https://middle-tier-api.example.com/.default (to request an access token for the middle tier API),
Resources
Protected web API – overview – Microsoft identity platform | Microsoft Docs
Get a token in a web app that calls web APIs – Microsoft identity platform | Microsoft Docs
https://docs.microsoft.com/en-us/azure/active-directory/develop/quickstart-configure-app-expose-web-apis
https://docs.microsoft.com/en-us/azure/app-service/configure-authentication-provider-aad
GitHub – Azure-Samples/ms-identity-dotnet-webapi-azurefunctions: DotNet Azure Function Web API secured by Azure AD
Other posts in this series
- What are Azure Application Objects and Service Principals?
- Azure AD OAuth Authorization Flows
- All you need to know about Azure AD Application, Web App and Web API authorization
- Connect to Azure AD-secured APIs in SharePoint Framework solutions